Thursday, July 31, 2014

Storing My Interactive Notebooks

Just a quick follow up to my last post.  I was able to go to my classroom this week to get a few things done, one of which was making sure I had space to organize my interactive notebook bins.  This is how they're going to be starting out the year, but who knows if it will stay this way.  I plan to spruce it up a bit more, but not until the end of August or when I go back to school in early September.  But, this will give you an idea as to how it will look.   The white bins are where the students will place their notebooks at the end of each class period.  The rectangular trays house glue, scissors, white out, tape and erasers (students are responsible for their own colored pens).  The square containers will be where each group (of four desks) throws away their scraps.  For more information on the jobs this, please visit my previous post describing in detail how I will work the routines with the interactive notebooks.  Oh and please ignore the top of the shelves, I just put that stuff there to keep it somewhere until I come back at the end of the summer to put it away.


Monday, July 28, 2014

Setting up the Classroom for Interactive Notebooks: Routines

Now that you know how last year worked for me, I think it's time to talk about how I'm going to be working this year with the Interactive Notebooks.  Though the start of school is still a month away for me (thankfully, I still have so much to do!), I have been planning out the first couple of weeks of school, namely the Interactive Notebook introduction.

Last year I didn't really discover the concept of Interactive Notebooks until the third marking period (over halfway through the year) but I implemented them right away.  I knew I was treading dangerous ground not really focusing on the routine establishment, but I didn't have a lot of time and wanted to jump right in.  Would I change that?  Not a chance.  Did I learn from it?  You betcha.

This year I am going to work hard on establishing routines.  Last year I used one basket/bucket per set of 4-5 students and those buckets housed colored pens, pencils, erasers, hi lighters, glue, tape, scissors and white out.  I wish I could say that everything stayed as it should and all of my students took good care of the items I spent {lots} of money on, but I can't.  They had very little respect for what was provided to them.  Many of them even used those buckets to throw their scraps of trash in.  There was no organization.  Students just grabbed whatever bucket they could when told - some didn't even grab the whole bucket, just pulled stuff from them.  Needless to say, I was less than pleased.  

That forced me to wise up.  Today I visited one of my favorite haunts, Dollar Tree (lol) and picked up some more baskets for my classroom.  I now am going to have those same buckets from last year in addition to what you see below.   I'm also going to be assigning numbers to each group.  This way if something goes missing, I can easily determine which group had it last.  This really is common sense and I'm slapping myself for not doing that last year, but like I said, I just wanted to jump in and see if it worked.  So, my students will now be assigned a school supply bucket where they will keep the scissors and glue that I provide for them.  This year they are responsible for pens, colored pencils, white out, hi lighters, etc.  They will also be assigned a small bucket for trash.  Each group will be responsible for throwing the small bucket of trash into the larger bucket.  We really only cut a few things per class period (if that), so small buckets will work for us.  Finally, last year I put my students' notebooks in a rolling drawer cart.  I wasn't too pleased with how it worked because the students seemed to never know which drawer was theirs (again, routines).  So this year I'm going to use tubs broken down into class periods.  Each group within the class period is going to have a different pattern of masking tape to put around the binding of their notebooks and then each class will put them into the tubs.  It's basically a combination of this idea and this idea.  Here's what some of my buckets/tubs will look like (I made the labels and used my Xyron machine to stick them on - the trash and supply bins both have group numbers on them for the kids to recognize).


Now that I have the structure, I need to assign roles to the kids.  I don't want a mad dash for the supply area every time we have class.  I'm thinking I want to set up something like this in my classroom but instead of having papers there, I want to put the class' tub there for the notebooks.  I generally do not let my students take them home because they lose them or they leave them in their lockers.  So, unless they need them to finish up an assignment or to study from, they stay in the classroom.  I'm always standing at my door to greet my kids before class starts, so I may even just ask a student to put the bin on the table at the start of class.  Then I need to assign students to be responsible for picking up the notebooks out of the tub (because otherwise I'll have mad chaos like I did last year and I do NOT want to go through that again).  This person will also be responsible for putting them back at the end of class.   I also plan on assigning a student to be responsible for picking up the supply basket, another for picking up any worksheets, another for emptying the trash bin and putting that along with the basket back on the shelf at the end of class.  Of course when they put materials back at the end of the period, I expect that they will organize everything prior to putting it back.  I do not anticipate having groups larger than 4, but I may need to make adjustments once I actually see my rosters for this coming year.  

I do want to note that this post was instrumental in helping me really narrow down the routines.  I knew I needed them, but wasn't quite sure how.  Now I'm excited to start establishing these routines.  

Keep posted as I go over more ideas and and how I plan on implementing Interactive Notebooks this coming year.  As always, comment if you have a question or leave me a comment telling me how you're implementing Interactive Notebooks in your classroom.


Sunday, July 27, 2014

The Big Interactive Notebook Post...Finally!

So, it's about time I did a follow up post to my Interactive Notebook post here and here.  I know, I'm a slacker.  

I think it's very important to start off by saying I DO NOT follow the traditional method of using Interactive Notebooks.  I see nothing wrong with the methodology of the left and right pages, I just don't do it.  I teach high school and a lot of the posts and pins I've seen about Interactive Notebooks are for elementary or middle school students.  There are very few Spanish teachers I've come across that use Interactive Notebooks, though I have found a few.  What I have found are tons of great ideas on Pinterest that have led me to some real gems that I'm happy to share with you on my Interactive Notebook Pinterest board.  I am incorporating a lot of Sarah's ideas this year for setting up the notebooks.

Back to mine.  I think it's important to emphasize I do treat these Interactive Notebooks a lot less like Interactive Notebooks than elementary teachers do.  Mine do consist of notes (and lots of them), vocabulary lists, etc.  But, I do use foldables, color coding and a huge reliance on organization (numbering, titling, table of contents, etc.).  Since I rarely use my textbook, this is the next best thing my students have to study from, so it needs to be the same for everyone.  I am not going to say I don't get questioned every day about the correct page to be on, what if my notes aren't as long as yours or mine are too long, etc.  It's really hard to keep them all where they're supposed to be, but I make all attempts necessary to do so because it's that important to me.  What I have found helps them to stay with me is giving them the number of pages they will be working with on a given day.  For example, if we're covering vocabulary, they know what page we'll be starting on, but I also tell them what page we'll be ending on.  I do the same with Grammar notes or practice activities we do.  If they write smaller than me (which most do), they usually don't take up as many pages as I do and that's fine.  I tell them to intentionally leave the pages blank.  If they write larger than me, they have to try to cram it all onto the proper pages.  Again, I write pretty large so this generally is not a problem for me. 

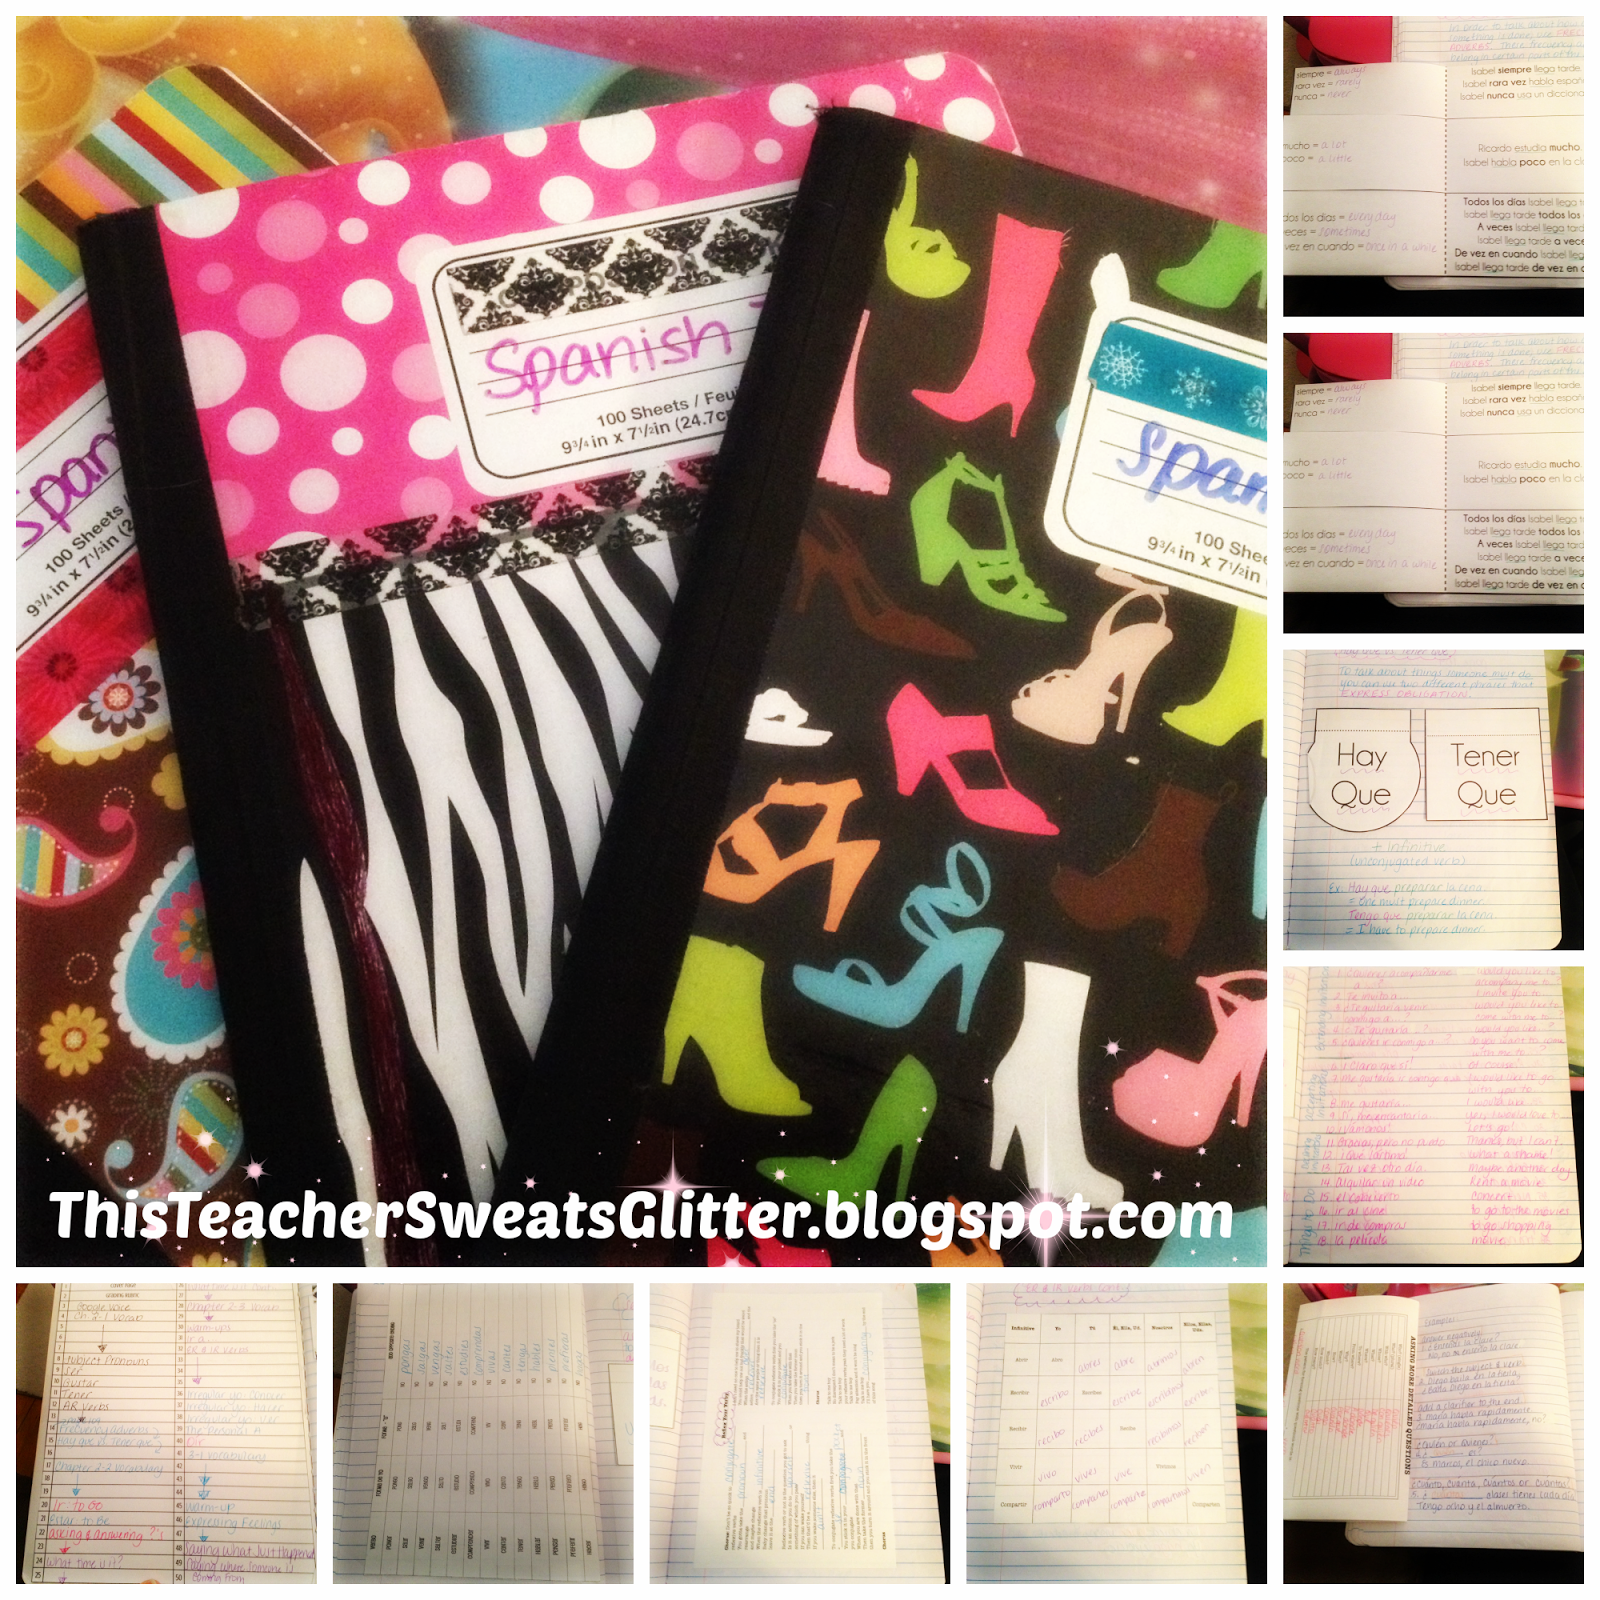
Now, let's talk about the ways I use the notebooks.  As I've said, I put everything in them in terms of vocabulary and grammar notes.  On rare occasions I will have my students complete a homework assignment or in class assignment in them, but for the most part they're really used as a resource rather than for practice (hence the fact that I do not do the left/right notebook method).  Here you can see some pictures of what I mean...


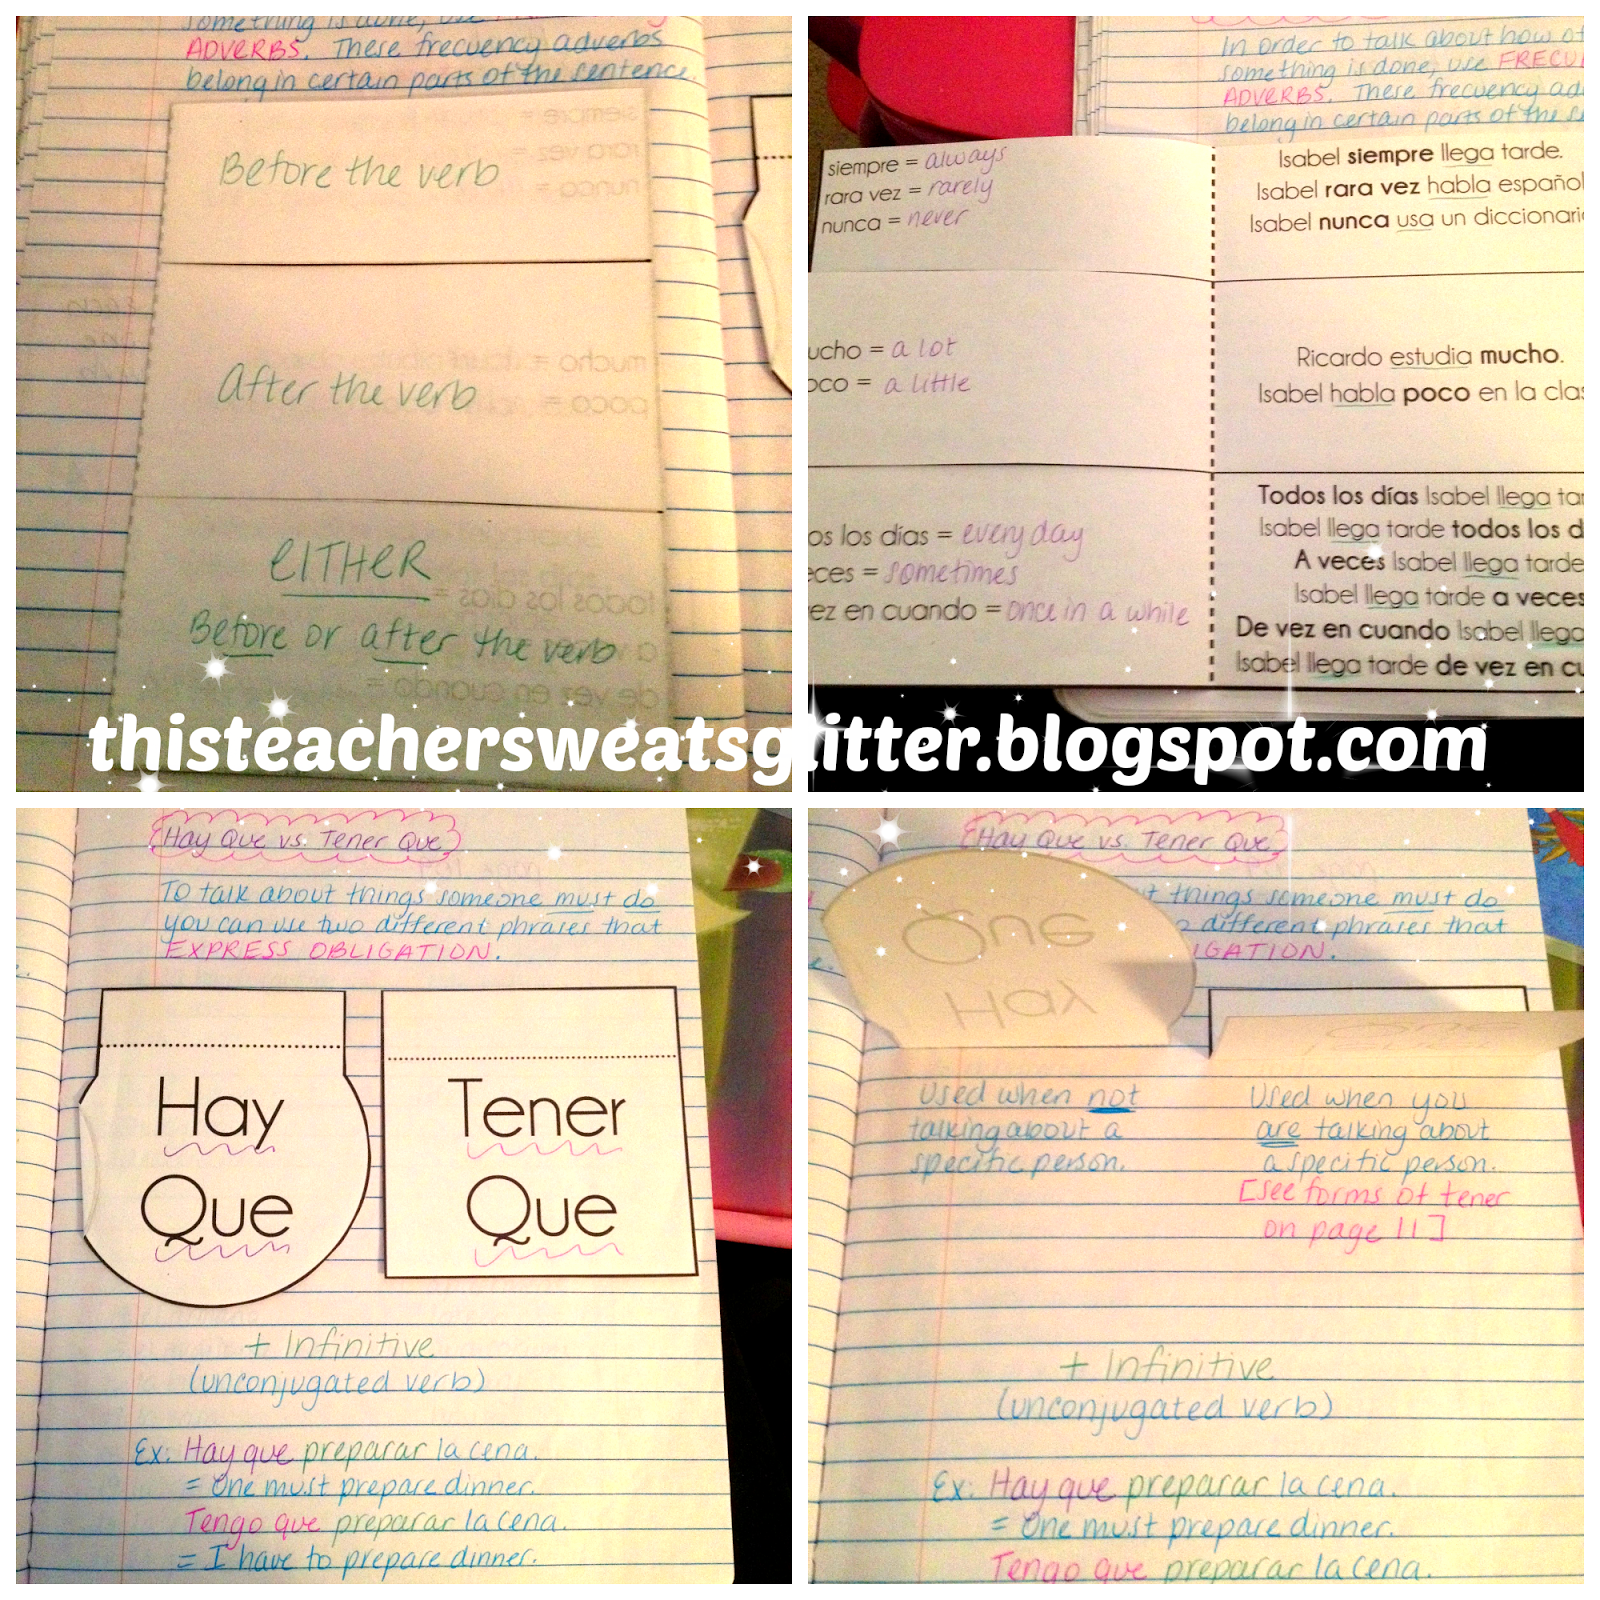
Sometimes I run out of space or have a grammar concept that I know is going to be A LOT of notes (Asking and Answering Questions is a HUGE topic for example).  When that happens, I tend to give the students more of a fill-in-the-blank type notes page and then just have them write examples on the notebook pages and just fill in key components on the worksheet notes.  The worksheet is then taped into the notebook and folded in half so they can close up the notebook and not lose the sheet.  Sometimes I have the students fill in charts that are just taped into the books and other times we complete cloze type activities with songs that help reinforce the information we've covered that day (this page is showing Reflex Your Verby - if you haven't checked this one out, you HAVE to!) 


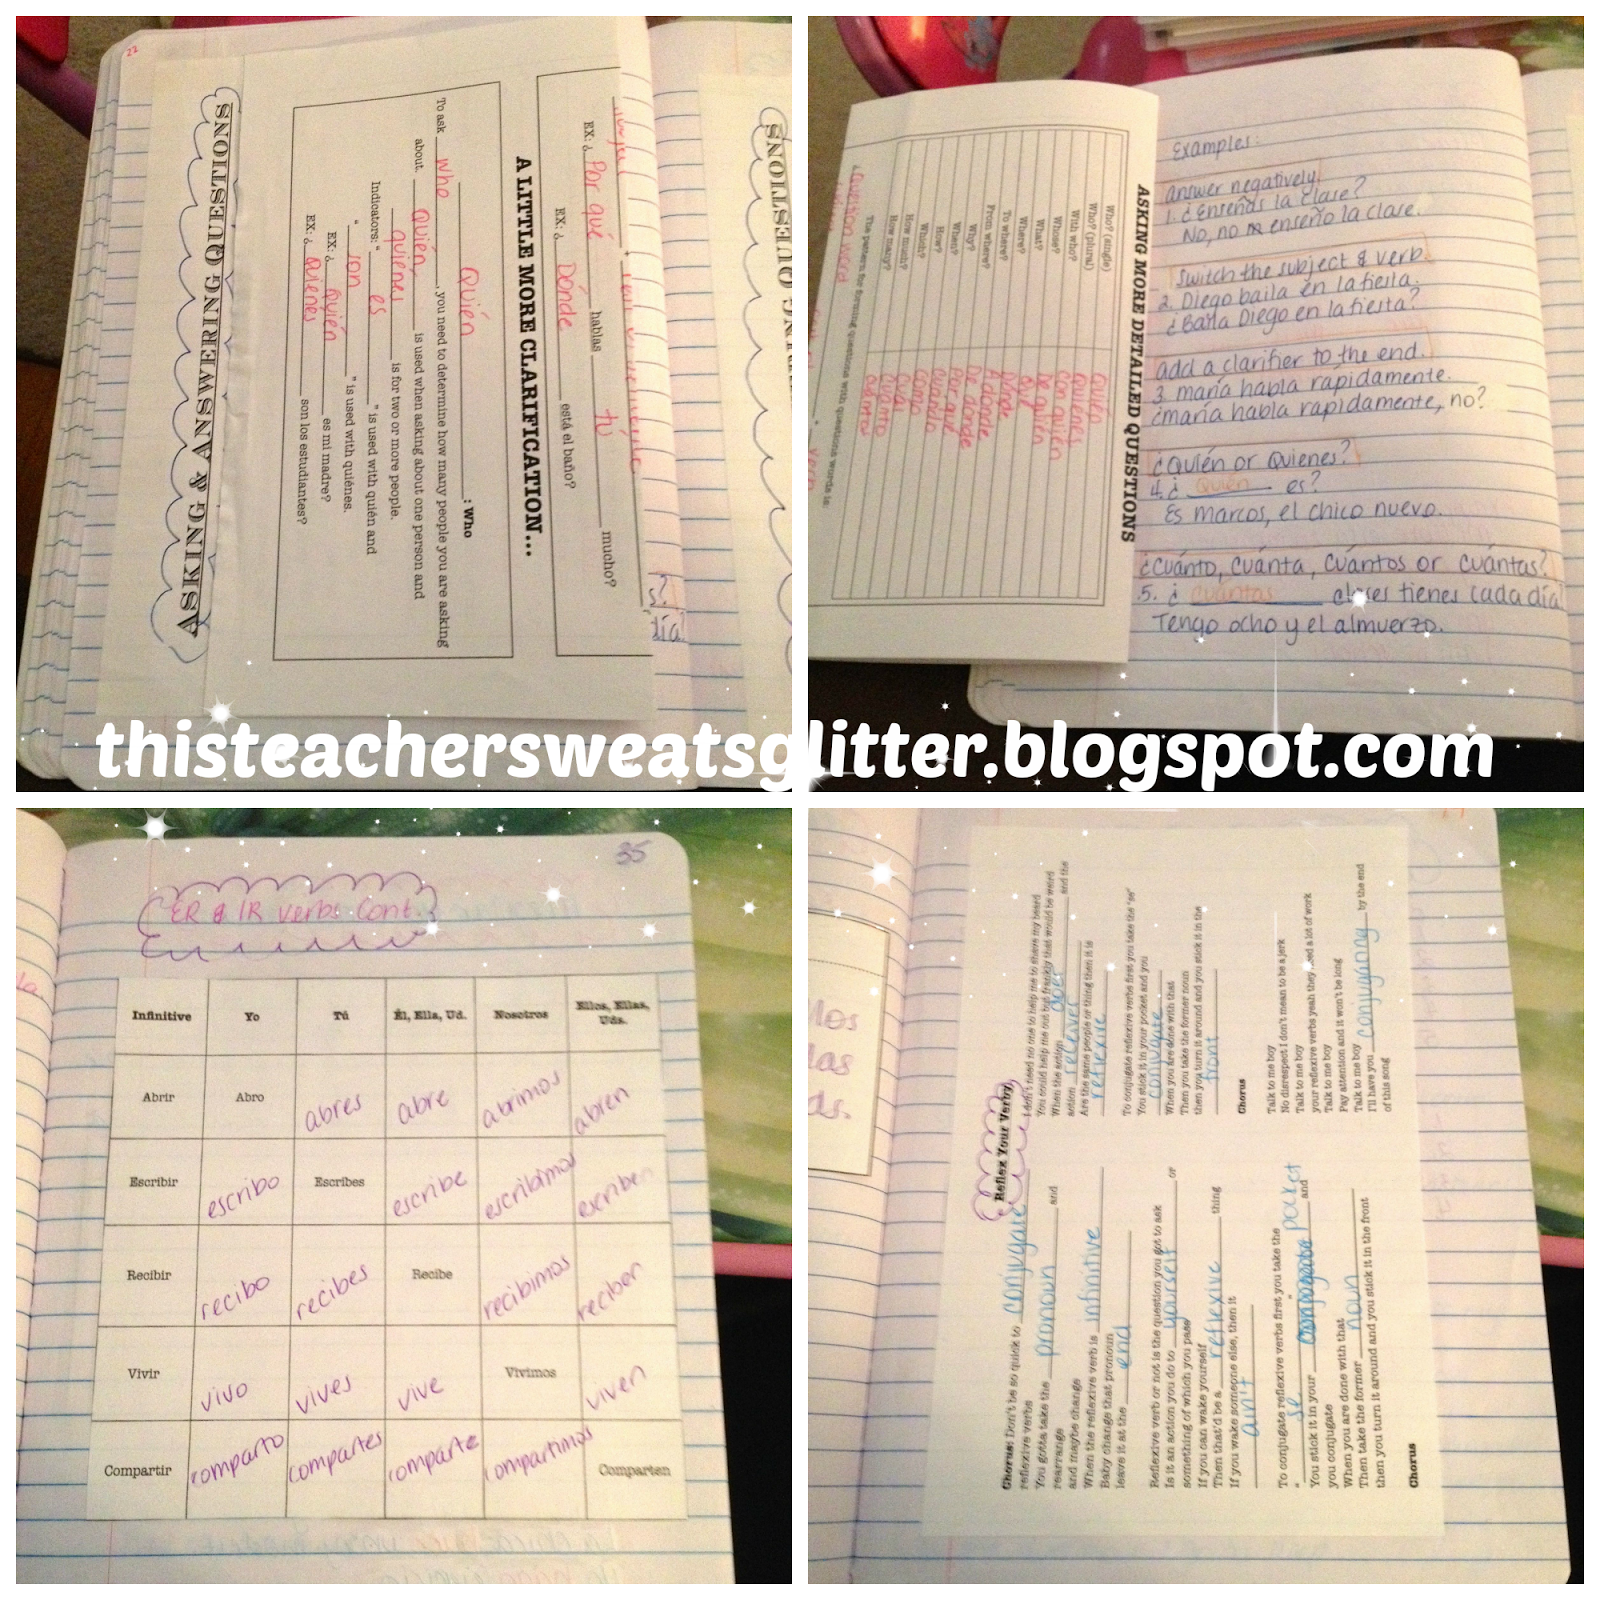
Though I really don't use textbooks, I am still tied to the vocabulary and grammar structures covered within the book, so my vocabulary lists are incredibly long.  The way I tackle them is to break them into sections and give each section a title (it may be the same as what the book uses or it may be something more updated).  I have the students write the section title in the margin and then the words for that section go next to the title.  Once we've reached the end of the section, they draw a line.  It's simple but helps keep them organized.  We keep the Spanish words/phrases on the left and the English on the right. 


I found it easiest to print out the table of contents over four pages and then have them glue/tape the pages onto the inside cover of the notebook.  I wish I could say all of my students kept up with the table of contents, but some didn't (and their grades reflected that).  But, those that did were able to easily follow and utilize their notebooks.  

I hope this helps you to figure out how to make Interactive Notebooks work for you.  The key thing is to realize that what someone else does may or may not work for you.  It's taken me 14 years of teaching to realize it, but things that work in other classes just may not work in mine, no matter how hard I try or how much better for my students it may be.  You ultimately have to do what will enable your students to learn.  Maintaining our Interactive Notebooks this way has worked for me and my students so far.  That could all change in September, but I'm still going to give it my all because I haven't felt the sense of achievement that I felt with my kids last year in a long time.

Comment and tell me what you do with Interactive Notebooks and how you do it.  If you don't use them yet, can I answer any questions for you?


Friday, July 11, 2014

Spanish Classroom Decor

Between my wedding business, teaching and daily life, I really never have the time to work on this blog or my Teachers Pay Teachers store.  I'm trying though.  So, yesterday I finally put together some revisions of either products that I posted or have just used.  Take a look...


One of the classes I teach is a self-contained Spanish class which is more vocabulary driven, so I took the time to create these number posters that help not only the self-contained class but my level 1 and 2 classes as well.  


This is something new that I came up with for next year, my Spanish calendar.  I don't use a pocket chart, so I have no idea if the pieces would fit inside properly.  What I'm planning on doing is putting them on a blank bulletin board I have behind my desk.  It's actually an old chalkboard that was covered with masking tape rendering it useless.   So I stuck cork board onto so it can actually be used.  Right now it's covered with black and white polka dot wrapping paper, just waiting for something to go on top.  So, I came up with these calendar pieces that I'm likely going to tack up with these funky thumbtack hooks I found and then switch them out each day.  Since the theme of my classroom is aqua chevron and black and white polka dots (I can't pick just one), I made two versions in case I decide to move it to one of the chevron boards instead of the polka dot board.  Once I'm able to get into my classroom, I'll take some pictures.  :)

I'm going to be working on some more posters for my TPT store as soon as I get a chance, so stay tuned!